Terraform
Lesson 4
Welcome to Infrastructure as Code! Terraform lets you define your cloud infrastructure using simple configuration files. Instead of clicking through the AWS console to create resources, you’ll write code that describes what you want—then Terraform makes it happen. This approach is faster, repeatable, and version-controlled, making it the industry standard for managing cloud resources.
Table of contents
- Terraform
What is Terraform?
Terraform is like a blueprint system for cloud infrastructure. You describe what you want (servers, databases, networks) in configuration files, and Terraform figures out how to create it. Here’s why it’s essential:
- Reproducible: Deploy the same infrastructure in dev, staging, and production
- Version Controlled: Track changes to your infrastructure just like application code
- Collaborative: Team members can review and approve infrastructure changes
- Cloud Agnostic: Works with AWS, Azure, Google Cloud, and more
Installing Terraform
Let’s get Terraform installed on your system. Choose your operating system below:
macOS Installation
The easiest way is using Homebrew:
# Install Homebrew if you don't have it
/bin/bash -c "$(curl -fsSL https://raw.githubusercontent.com/Homebrew/install/HEAD/install.sh)"

# Add HashiCorp tap
brew tap hashicorp/tap

# Install Terraform
brew install hashicorp/tap/terraform

# Verify installation
terraform --version
Linux Installation (Ubuntu/Debian)
# Add HashiCorp GPG key
wget -O- https://apt.releases.hashicorp.com/gpg | gpg --dearmor | sudo tee /usr/share/keyrings/hashicorp-archive-keyring.gpg

# Add HashiCorp repository
echo "deb [signed-by=/usr/share/keyrings/hashicorp-archive-keyring.gpg] https://apt.releases.hashicorp.com $(lsb_release -cs) main" | sudo tee /etc/apt/sources.list.d/hashicorp.list

# Update and install
sudo apt update && sudo apt install terraform

# Verify installation
terraform --version
Windows Installation
- Download Terraform from terraform.io/downloads
- Unzip the file to a directory (e.g.,
C:\terraform) - Add the directory to your PATH:
- Search “Environment Variables” in Start Menu
- Edit System Environment Variables
- Add
C:\terraformto Path
- Open a new Command Prompt and verify:
terraform --version
Your First Terraform Project
Time to create your first cloud resource! We’ll deploy an EC2 instance (a virtual server) in AWS.
Step 1: Create Your Project Directory
# Create and enter project directory
mkdir my-first-terraform
cd my-first-terraform
Step 2: Write Your First Terraform Configuration
Create a file called main.tf in your code editor:
# Configure the AWS Provider
terraform {
  required_providers {
    aws = {
      source  = "hashicorp/aws"
      version = "~> 5.0"
    }
  }
  required_version = ">= 1.0"
}

# Set up the AWS provider
provider "aws" {
  region  = "us-east-1"
  profile = "learn-aws"  # Use the profile we created earlier
}

# Create an EC2 instance
resource "aws_instance" "my_first_server" {
  ami           = "ami-0c02fb55956c7d316"  # Amazon Linux 2 AMI
  instance_type = "t2.micro"                # Free tier eligible

  tags = {
    Name = "My-First-Terraform-Server"
    Environment = "Learning"
  }
}
Understanding the Code
Let’s break down what each section does:
1. Terraform Block
terraform {
  required_providers {
    aws = {
      source  = "hashicorp/aws"
      version = "~> 5.0"
    }
  }
}
This tells Terraform which providers (cloud platforms) you’re using. The ~> 5.0 means “use version 5.x but not 6.0”.
2. Provider Block
provider "aws" {
  region  = "us-east-1"
  profile = "learn-aws"
}
Configures how to connect to AWS. The profile refers to the credentials we set up earlier.
3. Resource Block
resource "aws_instance" "my_first_server" {
  ami           = "ami-0c02fb55956c7d316"
  instance_type = "t2.micro"

  tags = {
    Name = "My-First-Terraform-Server"
  }
}
Defines what to create:
aws_instance: The type of resource (EC2 instance)my_first_server: Your name for this resource in Terraformami: The operating system imageinstance_type: The size of the server (t2.micro is free tier)tags: Labels to help you identify resources in AWS
Step 3: Initialize Terraform
Before Terraform can work, it needs to download the AWS provider plugin:
terraform init
You’ll see output like:
Initializing the backend...
Initializing provider plugins...
- Installing hashicorp/aws v5.x.x...
- Installed hashicorp/aws v5.x.x

Terraform has been successfully initialized!
Step 4: Preview Your Changes
Before creating anything, let’s see what Terraform will do:
terraform plan
This shows:
- Resources to be created (marked with +)
- Resource properties
- No actual changes are made yet
Step 5: Create Your Infrastructure!
Ready? Let’s create your server:
terraform apply
Terraform will:
- Show you the plan again
- Ask for confirmation (type
yes) - Create your EC2 instance
- Display a success message
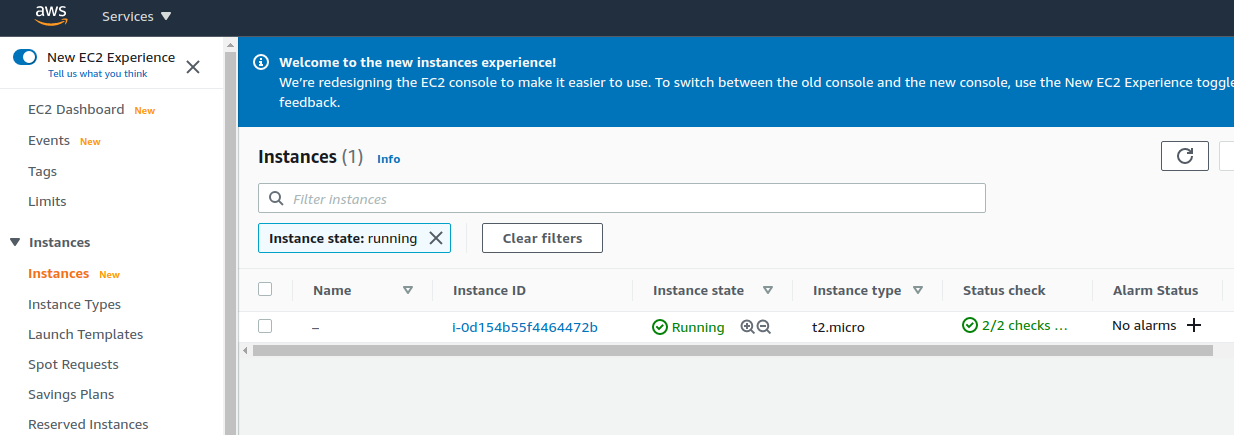
Step 6: See Your Server in AWS
- Log into the AWS Console
- Navigate to EC2 (search in the top bar)
- Click “Instances” in the left sidebar
- You should see your instance named “My-First-Terraform-Server”!
Important Terraform Commands
Here are the commands you’ll use most:
| Command | What it does |
|---|---|
terraform init | Initialize a project, download providers |
terraform plan | Preview changes without applying them |
terraform apply | Create or update infrastructure |
terraform destroy | Remove all resources (use carefully!) |
terraform fmt | Format your code properly |
terraform validate | Check if your configuration is valid |
Clean Up Your Resources
AWS charges for running instances, so let’s clean up:
terraform destroy
Type yes when prompted. This removes all resources defined in your Terraform files.
Best Practices from Day One
Start with these good habits:
- Always run
planbeforeapply: Review changes before making them - Use meaningful names:
web_serveris better thaninstance1 - Add tags: Help identify resources and track costs
- Format your code: Run
terraform fmtbefore committing - Don’t hardcode secrets: Never put passwords or keys in
.tffiles
Common Beginner Issues
“No valid credential sources found”
- Check your AWS profile:
aws configure list --profile learn-aws - Ensure you’re using the correct profile name in your provider block
“Instance type not supported in this availability zone”
- Some instance types aren’t available everywhere
- Try changing the region or instance type
“Cannot destroy resource - does not exist”
- Your resources might have been deleted outside Terraform
- Run
terraform refreshto sync state
Practice Exercise
Try modifying your configuration:
- Change the instance type to
t3.micro - Add more tags (like
Owner = "Your Name") - Run
terraform planto see the changes - Apply the changes with
terraform apply
Click for solution
```hcl resource "aws_instance" "my_first_server" { ami = "ami-0c02fb55956c7d316" instance_type = "t3.micro" # Changed from t2.micro tags = { Name = "My-First-Terraform-Server" Environment = "Learning" Owner = "Your Name" # Added new tag } } ```What You’ve Accomplished
✅ Installed Terraform on your system
✅ Wrote your first Infrastructure as Code
✅ Created real cloud infrastructure with code
✅ Learned essential Terraform commands
✅ Safely destroyed resources to avoid charges
You’ve just taken a huge step! Instead of clicking through the AWS console, you defined infrastructure as code. This is how professionals manage thousands of servers across multiple environments.
Next Steps
Ready to dive deeper into AWS? Head to the EC2 section where you’ll learn to build more complex infrastructure, including web servers you can actually connect to!
Remember: You can practice this lesson as many times as needed. Just run terraform destroy to clean up, and start fresh. The more you practice, the more natural it becomes!