Understanding AMIs - Your Server’s Starting Point
Lesson 5
Ready to learn about one of the most important concepts in cloud computing? An Amazon Machine Image (AMI) is like a template or recipe for creating servers. Just like a cookie cutter shapes cookies, an AMI shapes what your server looks like when it starts up.
Think of it this way:
- AMI = Server Template: Contains the operating system, software, and initial setup
- Your Phone’s Factory Reset: When you reset your phone, it goes back to how it came from the factory
- Server Blueprints: AMIs are the blueprints that tell AWS exactly how to build your server
Why are AMIs important? Instead of manually installing an operating system, web server software, and applications on every new server, you can choose an AMI that already has everything pre-installed. It’s like buying a pre-furnished apartment instead of an empty room!
Common AMI types include:
- Basic Operating Systems: Linux, Ubuntu, Windows Server (like a blank canvas)
- Web Servers: Pre-configured with Apache or Nginx (ready to serve websites)
- Application Stacks: WordPress, databases, development environments (fully-loaded with specific software)
- Custom Images: Your own saved configurations (like your personal server template)
Important: AMIs Are Region-Specific
New to AWS regions? Check out AWS Fundamentals for a quick overview of regions and other core concepts. Don’t worry if you haven’t read it yet - we’ll explain what you need to know here!
Here’s something crucial to understand: Each AMI has a different ID in each AWS region. Think of it like postal codes - the same McDonald’s franchise might exist in different cities, but each location has a different address.
What this means for you:
- An AMI ID that works in
us-east-1(Virginia) won’t work inus-west-2(Oregon) - You need to find the correct AMI ID for your specific region
- If you get an “AMI not found” error, you’re probably using the wrong region’s ID
Real-world example:
- Amazon Linux in Virginia:
ami-0c02fb55956c7d316 - Amazon Linux in Oregon:
ami-0efcece6bed30fd98 - Same AMI, different locations, different IDs!
Table of contents
- Understanding AMIs - Your Server’s Starting Point
- Finding the Perfect AMI for Your Project
- Step 2: Create a WordPress Site with Terraform
- What You’ve Accomplished
Finding the Perfect AMI for Your Project
AWS offers thousands of pre-built AMIs, like a massive app store for servers. Some are free (like basic Linux), others cost money (like specialized software), and some require a one-time “subscription” to use.
Why search for AMIs?
- Save time: Instead of installing WordPress manually, use a WordPress AMI
- Get started faster: Someone else already did the hard setup work
- Professional quality: Many AMIs are maintained by software companies
Today’s mission: We’ll find and use a WordPress AMI to create a fully-functional website in minutes!
Step 1: Subscribe to a WordPress AMI
Some AMIs require a one-time “subscription” (like accepting terms of service) before you can use them. We’ll do this by launching one instance manually, then we can use it in Terraform forever.
Think of it like: Downloading an app from the app store - you agree to the terms once, then you can use it anytime. Follow these steps to subscribe to WordPress:
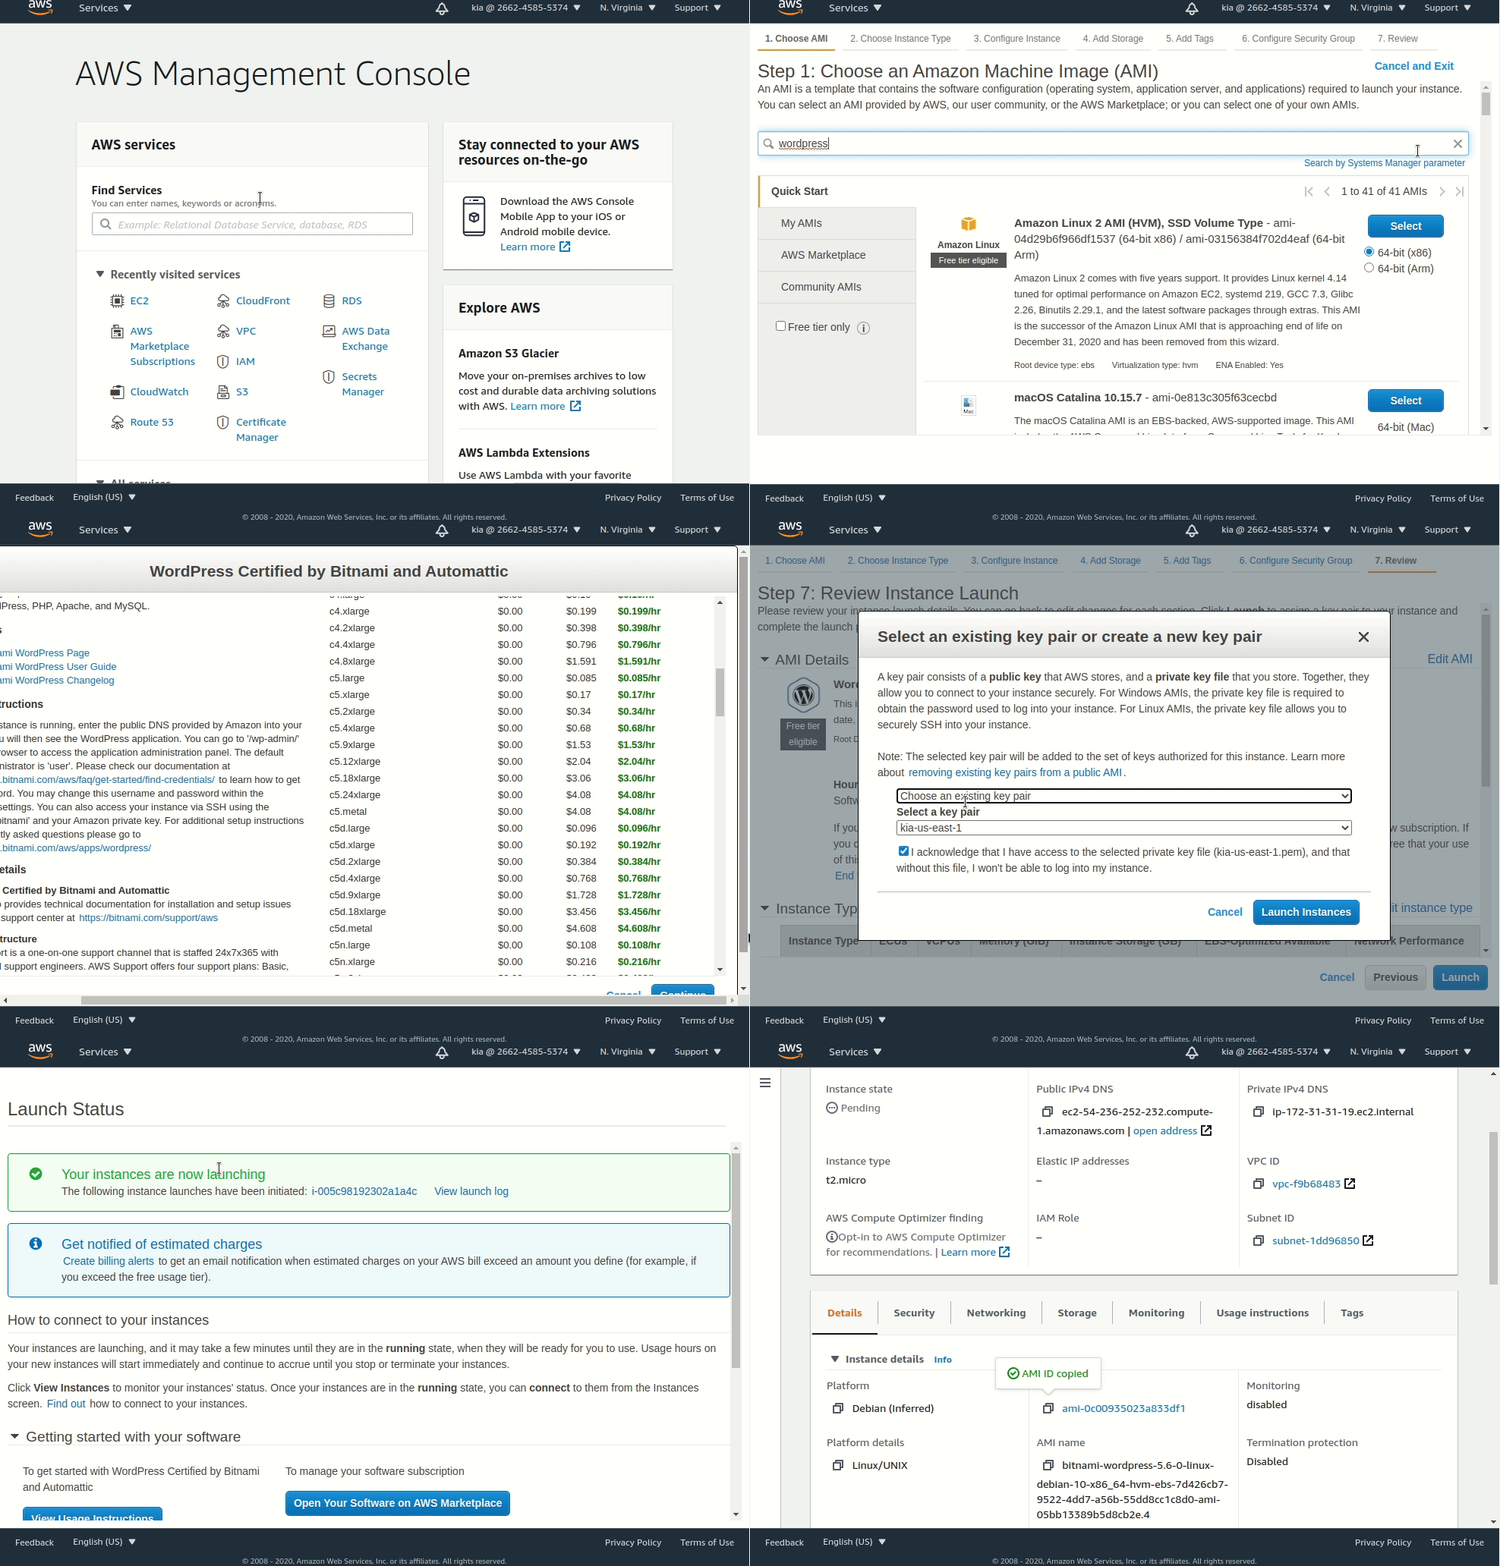
- Log into AWS Console
- Use your bookmarked AWS Console link
- Go to EC2
- Search “EC2” in the top search bar
- Click “EC2” from the results
- Click “Instances” in the left sidebar
- Start Launching an Instance
- Click the orange “Launch instances” button (top right)
- Search for WordPress
- You’ll see “Choose an Amazon Machine Image (AMI)” at the top
- In the search box, type:
wordpress - Click “AWS Marketplace” in the left sidebar (important!)
- Select WordPress AMI
- Find “WordPress Certified by Bitnami and Automattic”
- Click “Select” on that option
- Click “Continue” when the pricing popup appears
- Quick Setup (we’ll delete this right away)
- Instance type: Choose
t2.micro(free tier) - Click “Review and Launch” (orange button)
- Instance type: Choose
- Launch It
- Click “Launch”
- Choose your key pair from dropdown (the one you created earlier)
- Check the acknowledgment box
- Click “Launch instances”
- Get the AMI ID (This is what we really need!)
- Click “View instances”
- Click on your new instance’s ID (blue link)
- In the “Details” tab, find “AMI ID”
- Copy this AMI ID - you’ll need it next!

Congratulations! You’ve just subscribed to a WordPress AMI. This process works for any AMI in the AWS Marketplace.
Common AMI types you’ll encounter:
- Amazon Linux 2: What we’ve been using (basic, reliable, AWS-optimized)
- Ubuntu: Popular Linux distribution (developer-friendly)
- Windows Server: For .NET applications and Windows-specific software
- Application AMIs: WordPress, databases, development environments
Important: Now delete this test instance to avoid charges:
- Click “Instance state” dropdown (top right)
- Choose “Terminate instance”
- Confirm the termination
What just happened? You subscribed to the WordPress AMI, which means you can now use it in Terraform anytime. The AMI ID you copied is your key to creating WordPress sites with code!
Step 2: Create a WordPress Site with Terraform
Now for the magic! Let’s use Terraform to deploy a WordPress website using the AMI you just subscribed to. This is where variables really shine - we only need to change one line!
Update Your Terraform Project
Remember your Terraform project? We’re going to modify it to use WordPress instead of our basic web server.
Change the AMI ID
- Open your project
- Open your code editor
- Navigate to your
my-first-ec2project folder
- Update the AMI variable
- Open
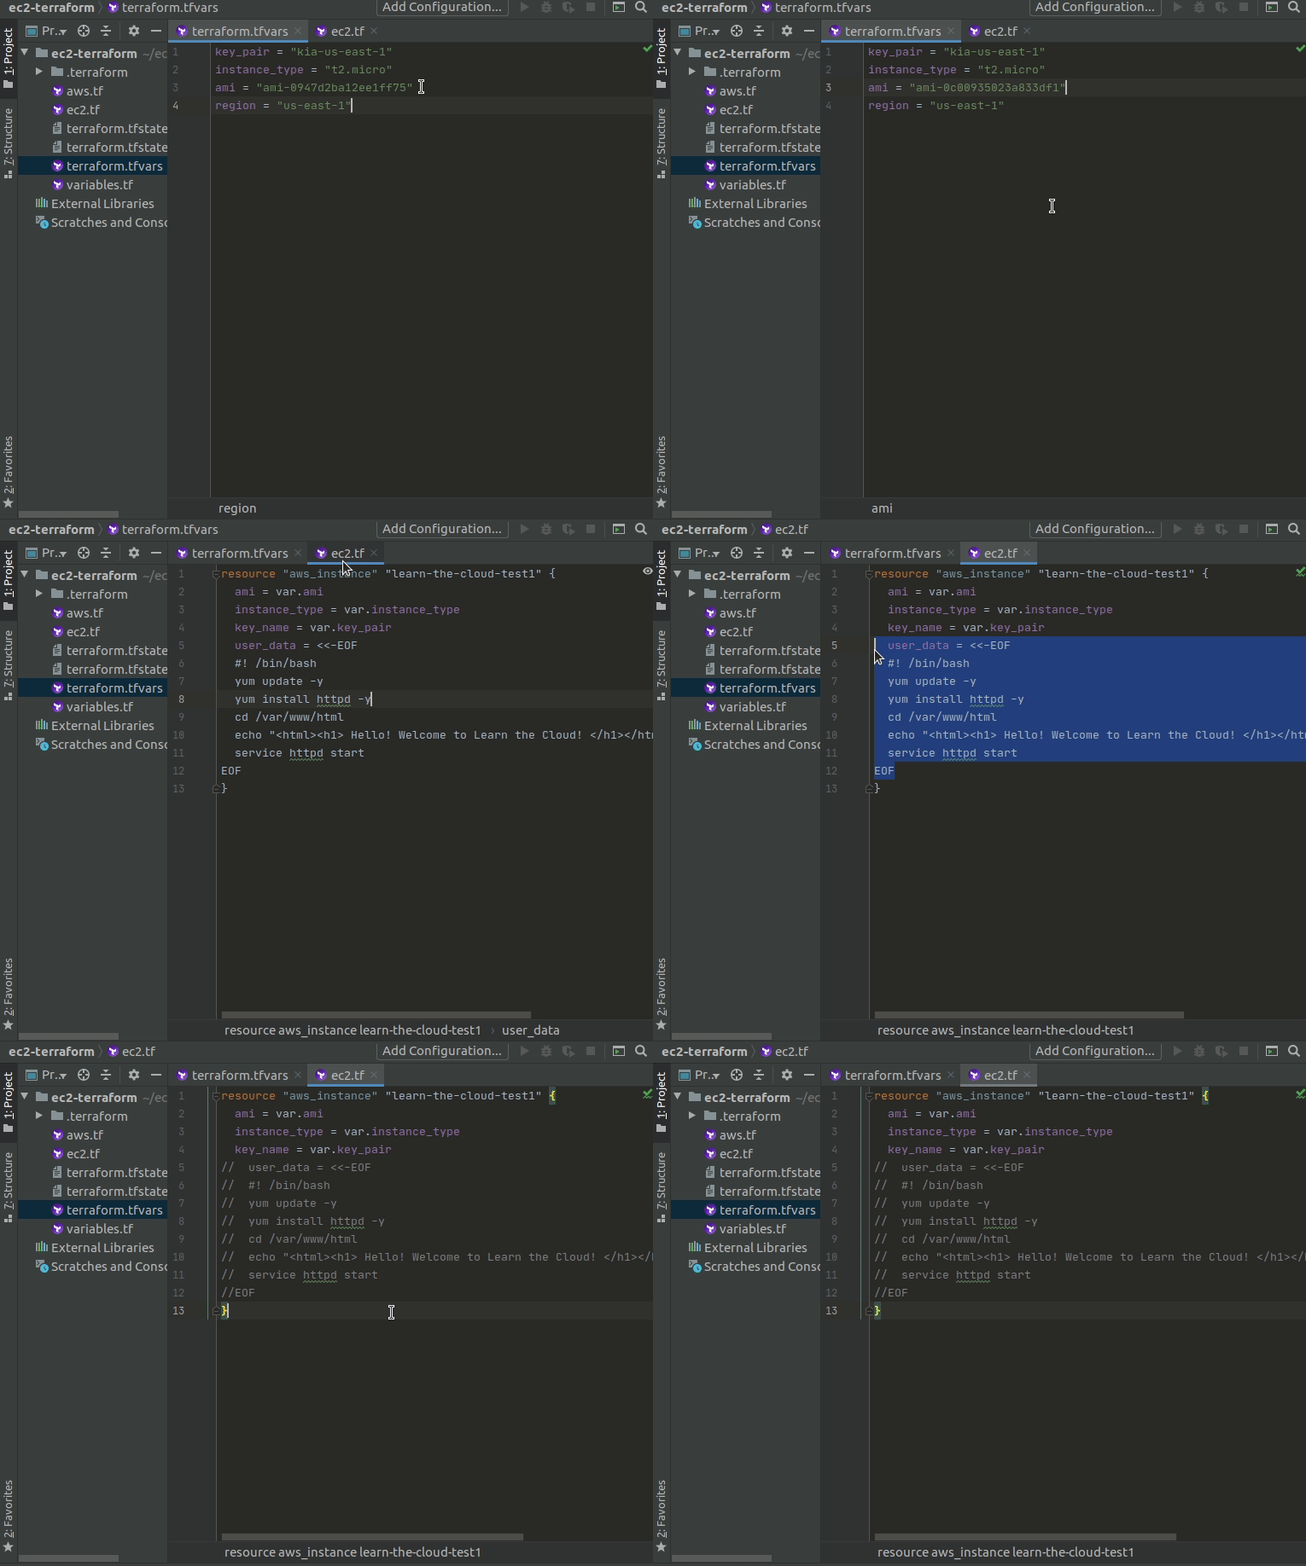
terraform.tfvars(this is where you set variable values) - Find the line that says:
ami = "ami-0c02fb55956c7d316" - Replace it with your WordPress AMI ID:
ami = "YOUR_COPIED_AMI_ID"
Quick reference: If you’re using
us-east-1, the WordPress AMI ID is:ami-0c00935023a833df1 - Open
- Remove the web server setup code
- Open
ec2.tf - Find the
user_datasection (the script that installed web server software) - Comment it out (don’t delete it - we’ll need it later!)
- Open
How to comment out code:
- Select the
user_datalines - Press
Ctrl + /(Windows/Linux) orCmd + /(Mac) - You’ll see
//appear at the start of each line - Terraform will ignore commented lines (they turn gray/green in most editors)

Deploy Your WordPress Site
Time to see the magic happen! We’re about to create a fully-functional WordPress website with just a few commands.
Deploy your site:
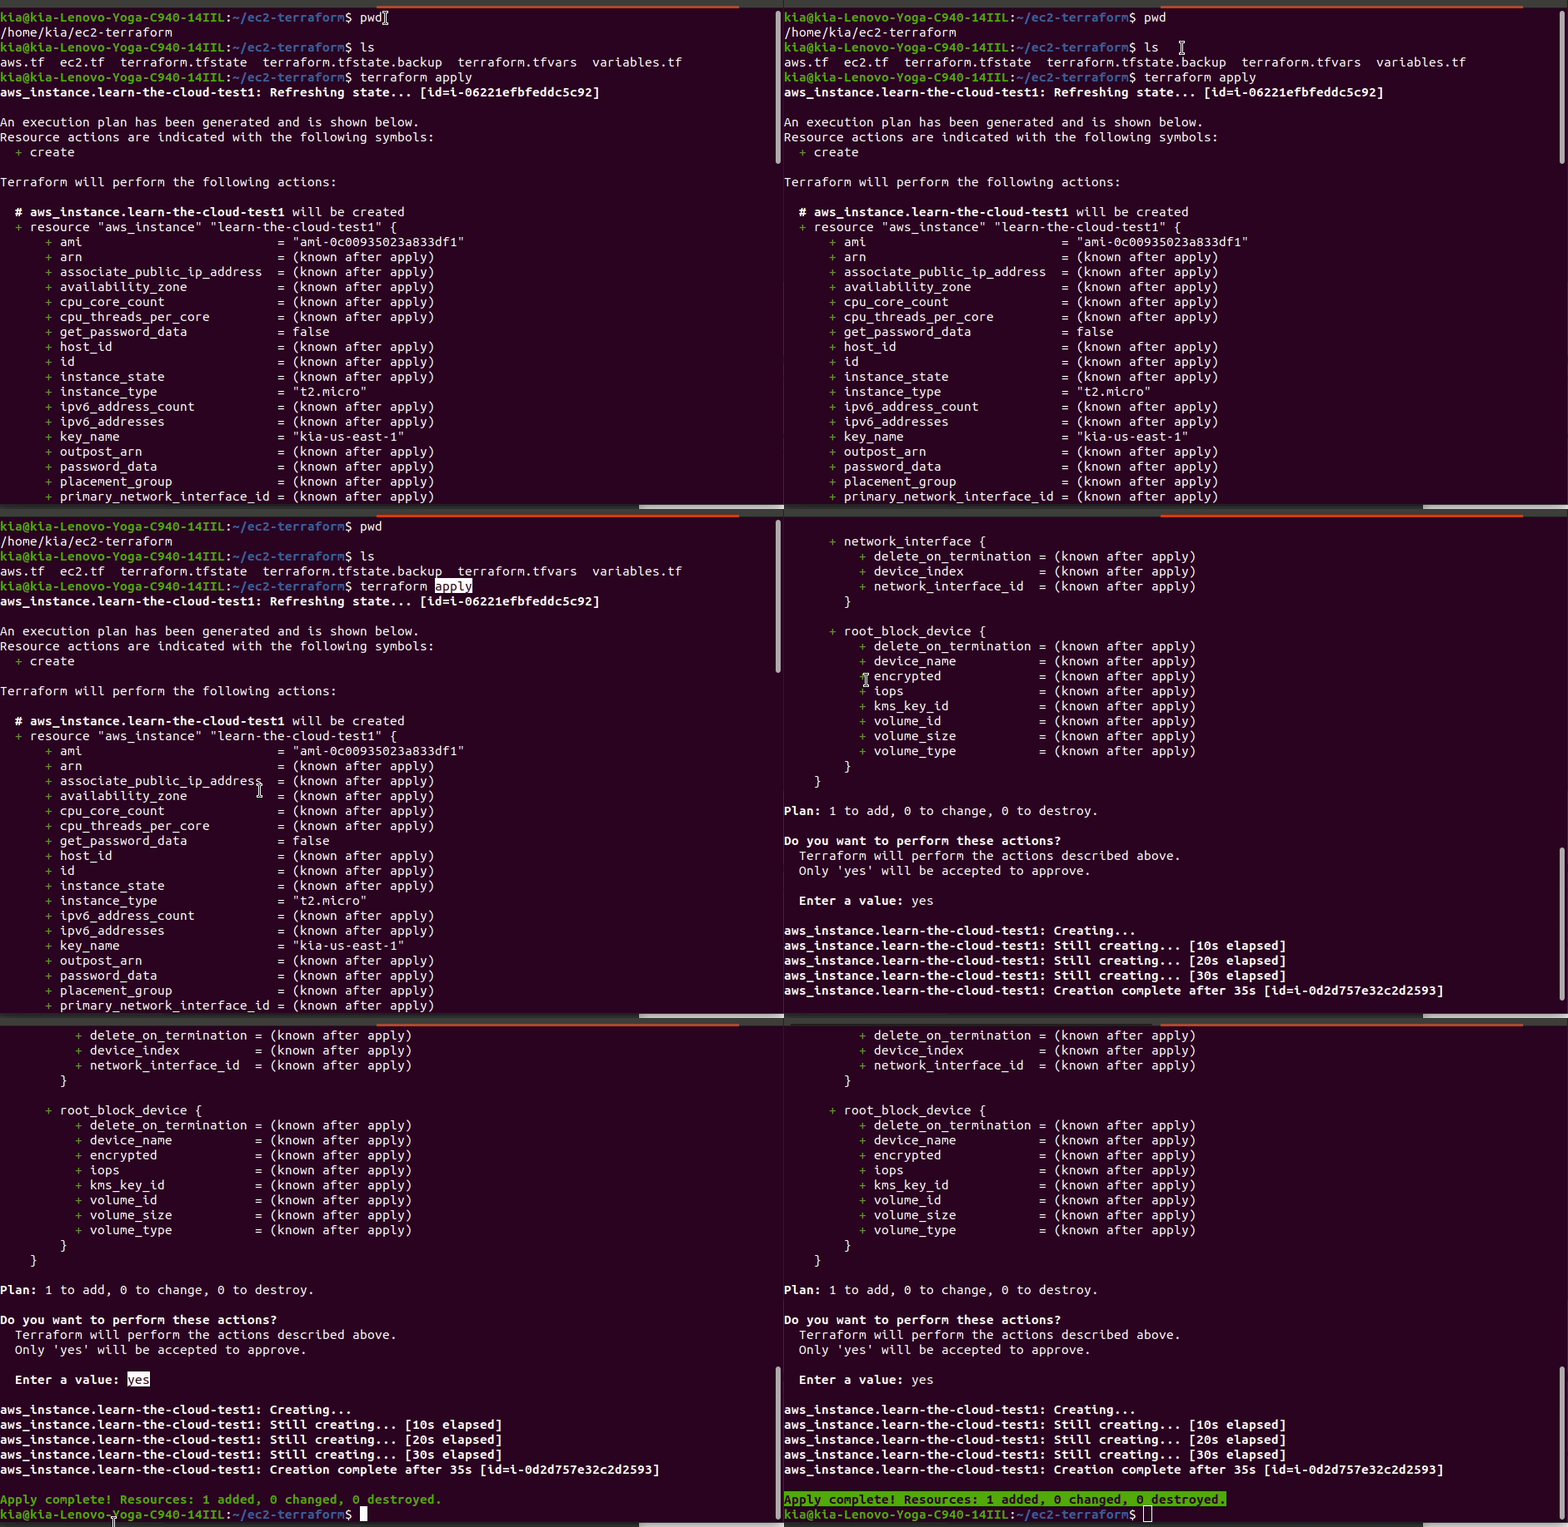
- Check your location
pwd # Should show your project directory cd my-first-ec2 # Navigate here if needed - Deploy with Terraform
terraform apply - Confirm deployment
- Type
yeswhen prompted - Wait for “Apply complete!” message
- Type

See Your WordPress Site Live!
Verify your deployment:
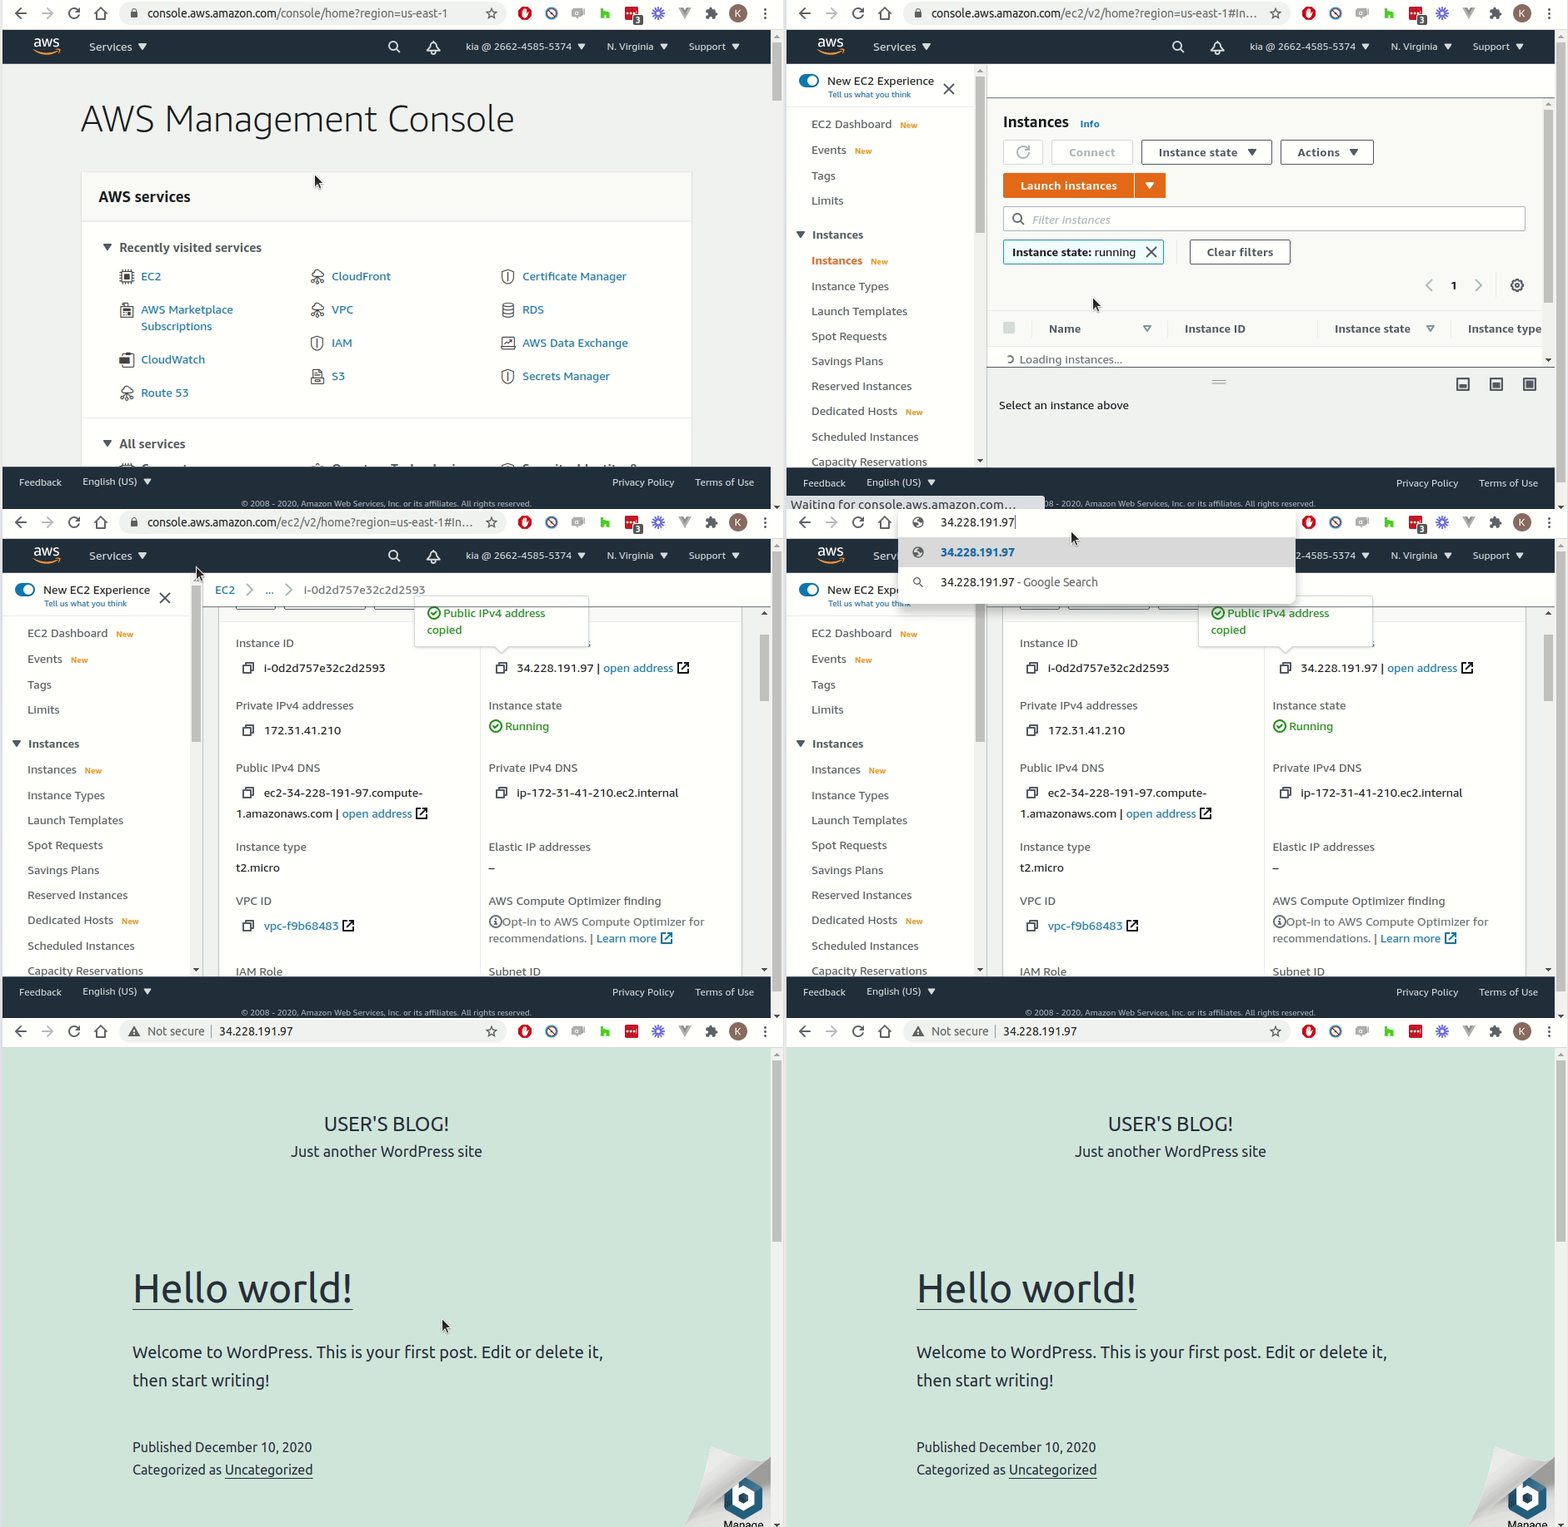
- Check in AWS Console
- Go to EC2 → Instances
- Click on your instance
- Verify the AMI ID matches what you set
- Copy the “Public IPv4 address”
- Visit your WordPress site
- Paste the IP address into a new browser tab
- Press Enter
Amazing! Instead of our simple “Hello World” page, you now have a fully-functional WordPress website complete with:
- WordPress login system
- Content management interface
- Database backend
- Web server configuration
- Security settings

What just happened? You deployed enterprise-grade software in minutes using Infrastructure as Code. This is the power of AMIs - complex software stacks become as easy as changing one variable!
Clean Up
terraform destroy
Type yes to delete your WordPress site and avoid charges.
What You’ve Accomplished
✅ Learned the concept of AMIs - Server templates that save massive amounts of time
✅ Understood region-specific IDs - Why the same AMI has different IDs in different locations
✅ Navigated AWS Marketplace - Found and subscribed to third-party AMIs
✅ Deployed complex software - Created a WordPress site in minutes instead of hours
✅ Experienced the power of variables - Changed one line to completely transform your infrastructure
✅ Managed AMI lifecycles - From subscription to deployment to cleanup
You’ve just experienced one of cloud computing’s biggest advantages: The ability to deploy complex, production-ready software stacks instantly using pre-built templates.
The Big Picture
What you learned applies everywhere:
- Time-saving: AMIs eliminate hours of manual software installation
- Consistency: Same setup every time, no human error
- Professional workflows: This is how companies deploy software at scale
- Cost management: Pre-built AMIs often save more money than they cost
Practice Options
Option 1: Try Different AMIs (Recommended)
Explore the AWS Marketplace and try different AMIs:
- Database AMIs: MySQL, PostgreSQL, MongoDB
- Development AMIs: Node.js, Python, Ruby environments
- Security AMIs: VPN servers, security tools
- CMS AMIs: Drupal, Joomla, other content management systems
Option 2: Reset and Repeat
Want to practice the process again?
- Change your AMI back to:
ami-0947d2ba12ee1ff75 - Uncomment your
user_data(select it and pressCtrl + /orCmd + /) - Run
terraform applyto get back to your basic web server - Repeat this lesson from the beginning
Next Steps
Ready to learn about server sizes and performance? Head to Instance Types where you’ll discover how to choose the right computational power for your applications!
Pro Tip: AMIs are like having a team of system administrators who pre-configured everything perfectly. You’re now thinking like a cloud architect!