Intermediate EC2
Lesson 8
Now that you understand so much more about EC2 we are going to add on to our ec2-terraform project. Instead of launching a single instance, you are going to launch two instances: one for a front-end website and one for the back-end application. We are also going to add tags to each so that you can differentiate between the two easily in AWS.
Note: We strongly encourage you work in
us-east-1.
Many modern web applications have two parts: a front-end and a back-end. While this is not always true, it is gaining more popularity and is a more complicated set-up than web applications which only have one part, so we will cover it in detail moving forward.
The front-end refers to the part of the website or web application you can see. It is the layout, colors, organization, navigation pane and routes between different pages that make up everything presented to you in the user interface (UI).
The back-end of an application refers to the code that you often can’t see. It houses everything that happens behind the scenes, from getting information from a database to filtering through search results to getting your personal information.
The front-end and back-end are often separate. With the EC2 stack we are building, this means that one or more EC2 instances might host the front-end and one or more separate EC2 instances might host the back-end. This is important because the front-end (website) often needs to be publicly accessible over the internet while the back-end code needs to be more secure and protected.
We’ll delve deeper into the security aspect in upcoming lessons. For now, you just need to know that one of the instances we create below will be using the Wordpress AMI (a front-end website) and one will be using the Amazon Linux 2 AMI (a back-end image that can be customized and used to host back-end code).
Table of contents
- Intermediate EC2
- Update your current
EC2 instance - Create an
EC2 instancefor the back-end - Add Some Tags
- Run
terraform apply - Run
terraform destroy - Next Steps
Update your current EC2 instance
We are going to be working in your ec2-terraform directory, so be prepared to edit files in your code editor.
First, let’s update the EC2 we already have created in our ec2-terraform project. You’ll need to:
- Change the
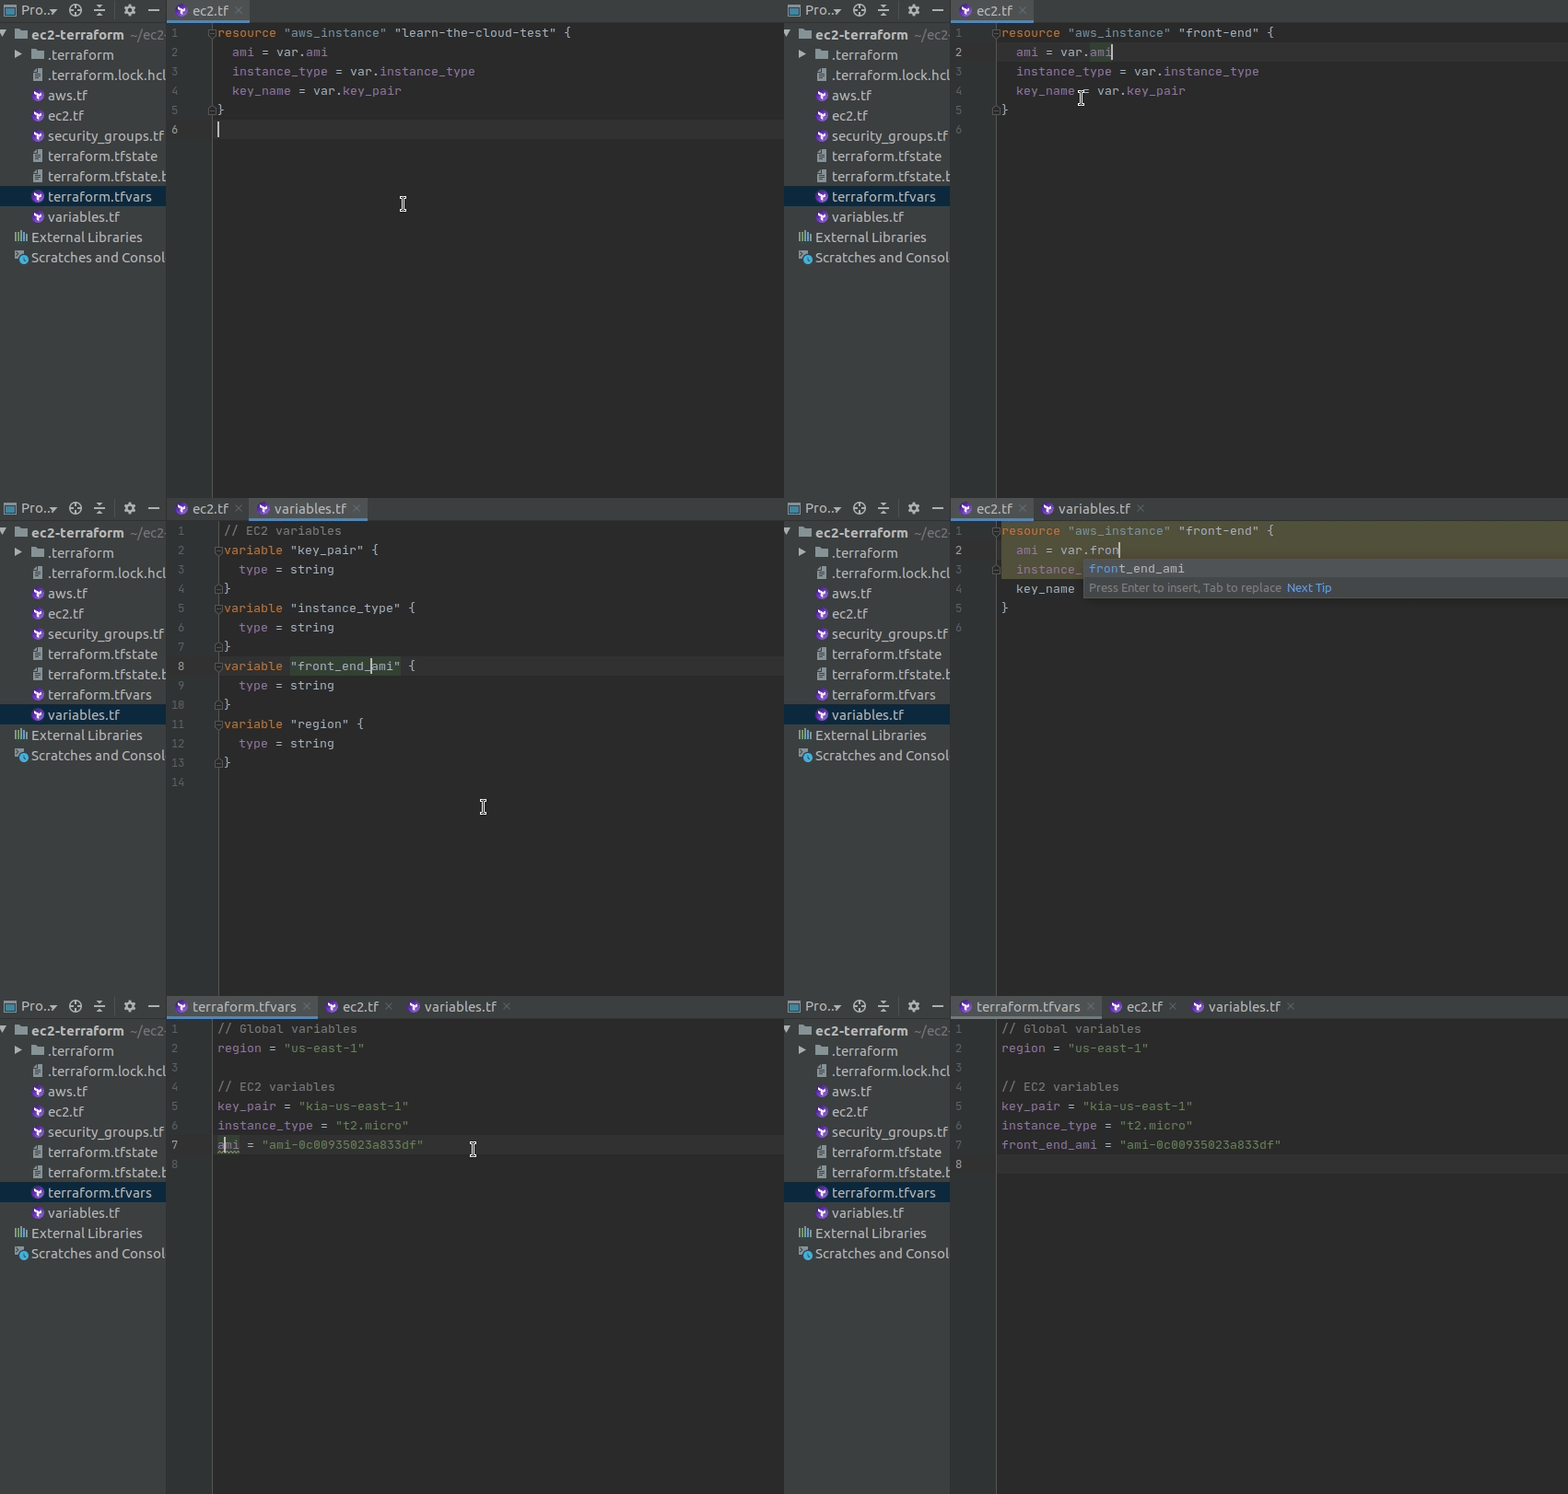
terraform nameof yourEC2fromlearn-the-cloud-testtofront-end. - Create a new variable in the
variables.tffile called:front_end_ami(type = string). - Refer to that new variable (
front_end_ami) for theamiparameter inec2.tfinstead of thevar.amiyou had before. - Give the new variable,
front_end_ami, a value in theterraform.tfvarsfile of theWordpress AMIid.Note: For
us-east-1the Wordpress AMI id is:ami-0c00935023a833df1. If you are not working inus-east-1you’ll need to find the ami-id for your region.

Create an EC2 instance for the back-end
Now that you have a fully-fledged out EC2 instance for your front-end, let’s create another one for your back-end!
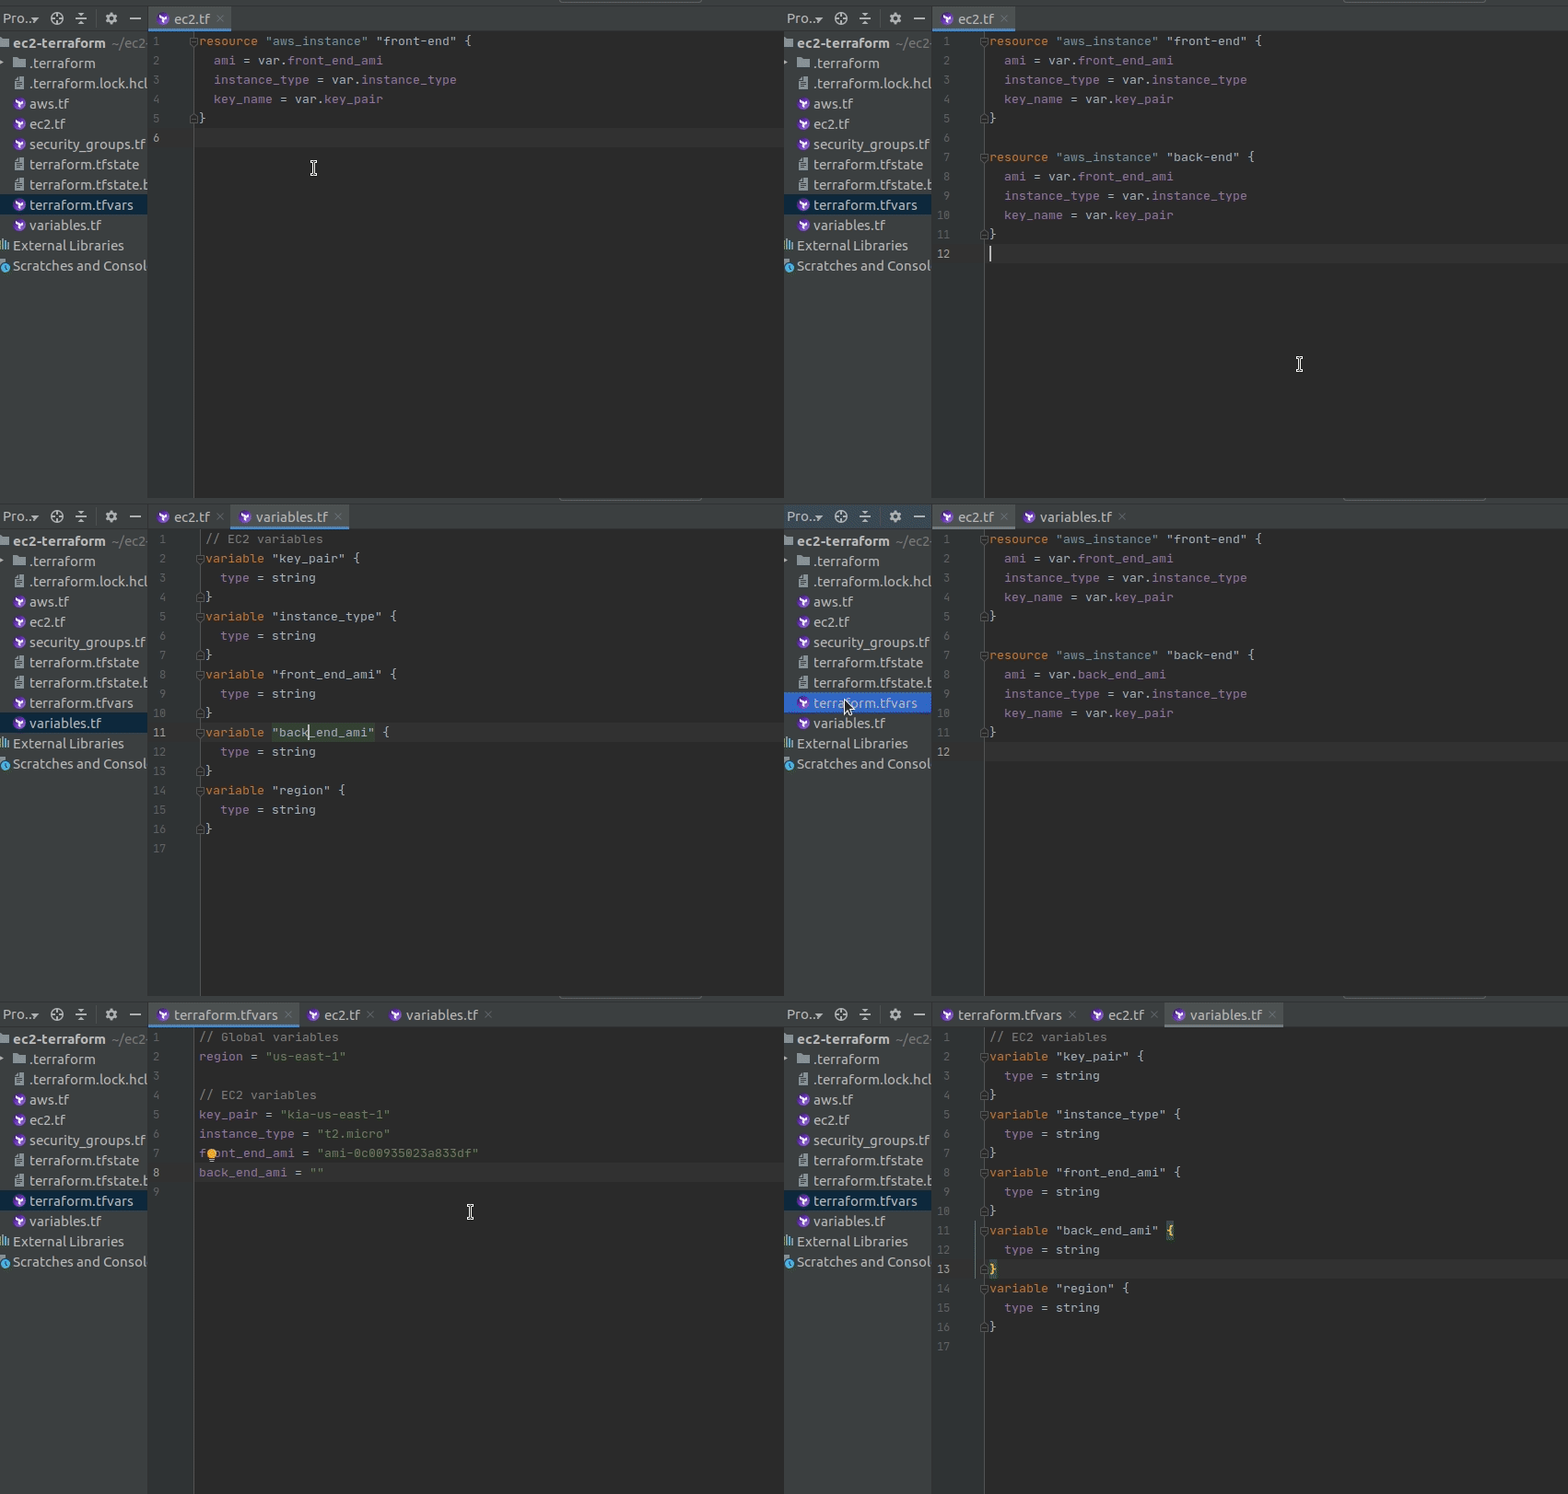
- Copy the entire resource block for your
ec2-instanceand paste it below the first one. - Change the
terraform namefrom tofront-endtoback-end. - Create a new variable in the
variables.tffile called:back_end_ami(type = string). - Refer to that new variable (
back_end_ami) for theamiparameter in your second ec2 instance (ec2.tf) instead of thevar.front_end_amicurrently there. - Give the new variable,
back_end_ami, a value in theterraform.tfvarsfile of theAmazon Linux 2 AMIid.Note: For
us-east-1the Amazon Linux 2 AMI id is:ami-0be2609ba883822ec. If you are not working inus-east-1you’ll need to find the ami-id for your region.

You now have two EC2 instances with different AMI ids: one for your front-end and one for your back-end!
Add Some Tags
Now we are going to add two tags to each instance so that they are more easily found and better organized inside of AWS. This isn’t important when you only have two resources in your account, but imagine having 50 instances, running a combination of different applications / software. If you needed to make a change, or ssh in to one of them, where would you start? Without solid tagging it can be hard to organize your resources.
Tags are key-value pairs (key = value, ie Name = Kathy or Company = BestCompanyEver) that you can associate with an instance (and most other AWS resources) to make them easy to find and filter through in AWS.
Add a tags object inside each of your EC2 resources with two tags: Name = "" and Deployment_Method = "".
tags = {
  Name = ""
  Deployment_Method = ""
}
Note: This object should be in between the main curly brackets of the resource block for each of your EC2 instances.
- The first line of each tag has a
keyofName. Give the first EC2 instance a value of"front-end"and the second EC2 instance a value of"back-end". - The second line of each tag has a
keyofDeployment_Method. Give both EC2 instances the valueterraform. - Lastly, create a new tag for each with a
keyofRegion. Give both EC2 instances the valueus-east-1(or whatever region you are working in).
For a complete solution, see below.
Solution
resource "aws_instance" "front-end" {
  ami = var.front_end_ami
  instance_type = var.instance_type
  key_name = var.key_pair

  tags = {
    Name = "front-end"
    Deployment_Method = "terraform"
    Region = "us-east-1"
  }
}

resource "aws_instance" "back-end" {
  ami = var.back_end_ami
  instance_type = var.instance_type
  key_name = var.key_pair

  tags = {
    Name = "back-end"
    Deployment_Method = "terraform"
    Region = "us-east-1"
  }
}
Run terraform apply
Apply your changes and log in to the AWS Console. See if you can find your instances (and tell them apart) more easily now that they have tags. Also, notice that you can go to the Public IP address of the front-end instance and see a Wordpress site, but you cannot see anything for your back-end instance!
This is expected behavior! It means you did it right!
Run terraform destroy
Delete the EC2 instances from your account when you are finished verifying they were created correctly.
Next Steps
You’ve now created two EC2 instances in AWS using terraform. You’ve updated the name, variables, and AMI ids of each one, as well as added tags that are applicable to each. How you feel about tags and creating new EC2 resources and variables determines what you should do next.
Redo the lesson (optional)
If you don’t feel as comfortable as you’d like with the above lesson, you can start over. To do this you’ll need to paste in the following code into the correct files.
- Open
ec2.tfand paste in the below resource block (paste over everything currently there):
resource "aws_instance" "learn-the-cloud-test" {
  ami = var.ami
  instance_type = var.instance_type
  key_name = var.key_pair
}
- Open
variables.tfand paste in the below provider block (paste over everything currently there):
// Global variables
variable "region" {
  type = string
}

// EC2 variables
variable "key_pair" {
  type = string
}
variable "instance_type" {
  type = string
}
variable "ami" {
  type = string
}
- Open
terraform.tfvarsand paste in the below provider block (paste over everything currently there):
// Global variables
region = "us-east-1"

// EC2 variables
key_pair = "yourname-us-east-1"
instance_type = "t2.micro"
ami = "ami-0c00935023a833df"
The steps above will get you back to where you started before this lesson, so you can continue practicing from scratch! Go back to the beginning of the lesson by clicking here.
Move On
Now that you feel comfortable using tags and creating multiple instances, you can move on to the next lesson, Basic Security Groups!